Brown Butter Recipe: How to Make Perfect Nutty Brown Butter
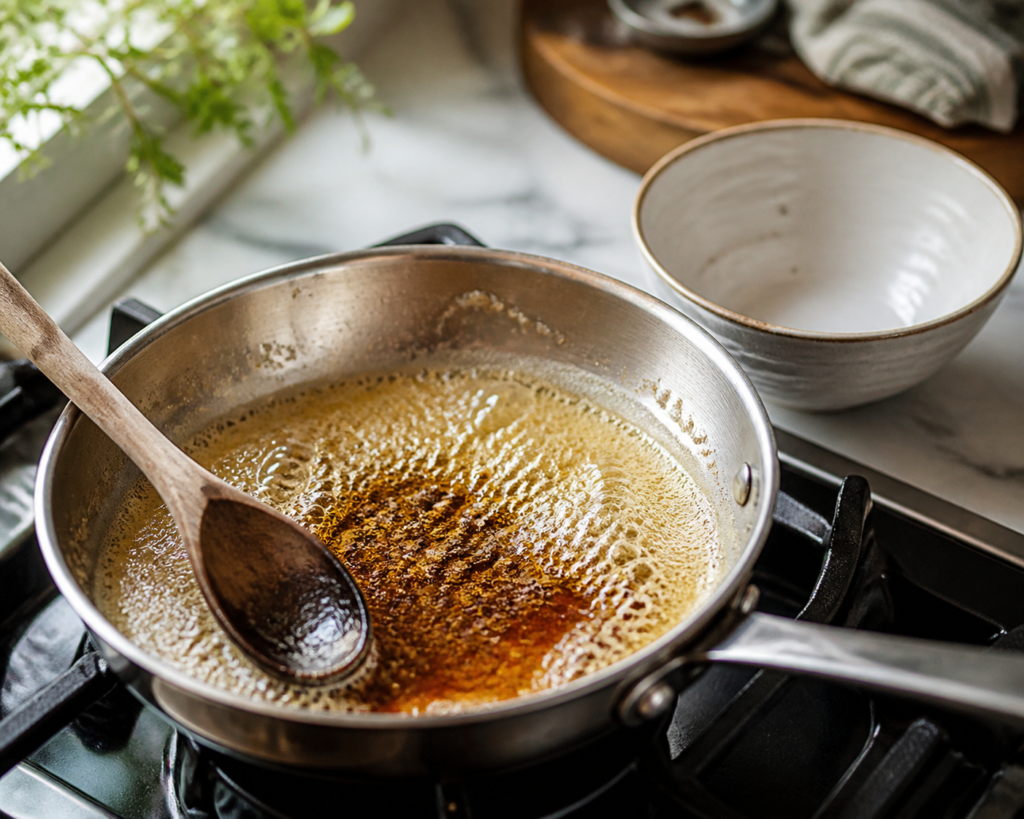
There are few simple kitchen techniques that transform an ordinary ingredient as dramatically as browning butter. This brown butter recipe turns everyday unsalted butter into a deeply aromatic, golden-brown ingredient with a rich, nutty flavor that can make cookies, cakes, pancakes, pasta, vegetables, sauces, and desserts taste remarkably more complex.
The process is surprisingly easy, but the difference between beautifully browned butter and burnt butter can happen in just a few seconds. The key is understanding what you are looking for: the butter will foam, the milk solids will begin to toast, the aroma will become nutty and caramel-like, and the color will shift from yellow to golden brown.
Once you learn how to recognize those stages, making brown butter becomes one of the most useful techniques in your kitchen.
This guide explains exactly how to make brown butter, how long it takes, what temperature works best, how to prevent burning, how to store it, and how to use it in both sweet and savory recipes.
What Is Brown Butter?
Brown butter is regular butter that has been gently heated until the water evaporates and the milk solids begin to toast and turn brown.
Butter contains three main components: butterfat, water, and milk solids. When butter melts, the water gradually cooks away. As the remaining milk solids heat up, they undergo browning reactions that create the characteristic toasted, nutty flavor.
The result is more concentrated and aromatic than ordinary melted butter.
You may also hear brown butter called beurre noisette, a French term meaning “hazelnut butter.” The name refers to its distinctive toasted, nut-like aroma rather than the addition of hazelnuts.
The entire process generally takes only about 5 to 10 minutes, depending on the amount of butter, pan size, and heat level.
Why You’ll Love This Brown Butter Recipe
Brown butter is one of those techniques that feels fancy but requires very little effort.
Here are a few reasons to keep this recipe in your cooking repertoire:
- Only one ingredient is required: Butter.
- It takes minutes to prepare.
- The flavor is dramatically richer than regular melted butter.
- It works in sweet and savory dishes.
- It can be made ahead of time.
- It adds depth without requiring complicated ingredients.
- It can replace regular butter in many recipes.
A spoonful of brown butter can turn a simple bowl of mashed potatoes into something special, while a few tablespoons can give chocolate chip cookies a toasted, almost caramel-like character.
Ingredients for Brown Butter
Unsalted Butter
1 cup (2 sticks / 226 grams) unsalted butter
Unsalted butter is ideal because it gives you complete control over the salt in the finished recipe. It also makes it easier to taste the nutty flavor without additional salt getting in the way.
You can brown salted butter if that is what you have available. Just remember that the finished butter will contain the salt already present in the butter.
For the most consistent results, use good-quality butter with a pleasant fresh flavor.
Recommended Tools
You do not need special equipment to make brown butter, but the right tools make the process easier.
Light-Colored Skillet or Saucepan
A stainless-steel or other light-colored pan is particularly helpful because you can clearly see the milk solids changing color.
Dark nonstick pans can make the color difficult to judge.
Wooden Spoon or Silicone Spatula
Use a heat-resistant spatula or wooden spoon to stir the butter and scrape the bottom of the pan.
Heatproof Bowl
Have a heatproof bowl ready before you start. This is important because the butter continues cooking from residual heat even after you remove it from the stove.
Fine-Mesh Strainer
A strainer is optional. If you want especially smooth brown butter without toasted milk solids, you can strain it. However, many recipes benefit from keeping the browned milk solids because they contain much of the toasted flavor.
How to Make Brown Butter
Step 1: Cut the Butter Into Pieces
Cut the butter into several evenly sized pieces.
This helps it melt more uniformly and prevents one section of the butter from overheating while another section is still solid.
Place the butter in a light-colored skillet or saucepan.
Step 2: Melt the Butter Over Medium Heat
Set the pan over medium heat.
As the butter melts, it will begin to bubble and foam. Stir occasionally so the butter heats evenly.
At this stage, the butter will still look pale yellow.
Do not walk away from the pan. Browning butter is quick once the water has evaporated.
Step 3: Let the Butter Foam
As the butter gets hotter, the water inside it begins evaporating.
You will notice vigorous bubbling and a layer of foam developing on top.
This is completely normal.
Continue stirring or gently swirling the pan. Scrape across the bottom regularly because the milk solids tend to settle there.
Step 4: Watch for the Milk Solids
After several minutes, the bubbling will become less vigorous as more water evaporates.
Small golden specks will begin appearing at the bottom of the pan.
This is the important stage.
Keep stirring continuously or very frequently. The milk solids can go from lightly toasted to burnt surprisingly quickly.
Step 5: Look for a Golden-Amber Color
The butter will gradually change from yellow to golden and then to a deeper amber-brown.
At the same time, the aroma will change.
Instead of smelling primarily like melted butter, it will smell toasted, nutty, rich, and slightly caramel-like.
Once the milk solids are golden brown and the butter smells intensely nutty, remove the pan from the heat.
Step 6: Transfer Immediately
Pour the brown butter into a heatproof bowl.
Do not leave it in the hot pan.
The residual heat from the pan can continue browning the milk solids, potentially turning them bitter or burnt.
If you want to preserve the exact degree of browning, transferring the butter immediately is one of the most important steps.
Step 7: Cool Before Using
Allow the brown butter to cool according to your recipe.
For a liquid brown butter sauce, use it warm or at room temperature.
If you need softened butter for cookies or cakes, allow it to cool until it reaches the appropriate consistency.
For solid brown butter, refrigerate it until firm.
How Do You Know When Brown Butter Is Done?
The most reliable way to judge brown butter is to use several signs at the same time rather than relying only on color.
The Color
The butter should be golden to amber with toasted brown milk solids.
It should not be nearly black.
The Smell
The aroma is one of the best indicators.
Properly browned butter smells:
- Nutty
- Toasted
- Rich
- Buttery
- Slightly caramel-like
If it smells acrid, smoky, or bitter, it has probably gone too far.
The Sound
At first, the butter will loudly sizzle and bubble because of its water content.
As the water cooks away, the bubbling will decrease.
This change tells you that the butter is approaching the browning stage.
The Appearance of the Milk Solids
Look for small golden-brown flecks at the bottom of the pan.
Those toasted milk solids are responsible for much of the flavor.
How Long Does It Take to Brown Butter?
For 1 cup of butter, the process generally takes about 5 to 10 minutes over medium heat.
The exact timing can vary depending on:
- Pan size
- Amount of butter
- Heat level
- Type of stovetop
- Starting temperature of the butter
- Moisture content of the butter
Rather than depending entirely on a timer, use the color, aroma, and bubbling as your guides.
Should You Use Salted or Unsalted Butter?
Both can work.
Unsalted Butter
Unsalted butter is generally preferred because you can control the amount of salt in the final dish.
It is especially useful for baking.
Salted Butter
Salted butter can be browned successfully and works well for sauces, vegetables, pasta, and other savory applications.
If using salted butter in a baking recipe, account for the additional salt.
Why Does Butter Foam When It Browns?
The foam is caused primarily by the water naturally present in butter.
When butter heats, that water turns into steam and escapes. The agitation of the steam passing through the butterfat creates bubbles and foam.
Once most of the water has evaporated, the milk solids can heat to higher temperatures and begin browning.
This is why the foaming stage is an important part of the process rather than something you need to remove.
Can You Brown Butter Without Burning It?
Absolutely. The trick is controlling the heat and paying attention.
Use medium heat rather than blasting the butter over high heat.
High heat may cause the milk solids to burn before you have enough time to react.
Stir frequently, especially once the butter starts turning golden.
Most importantly, remove the butter from the heat as soon as it reaches the desired level of browning.
Remember that the pan remains hot after you turn off the stove.
Expert Tips for Perfect Brown Butter
Use a Light-Colored Pan
This is one of the easiest ways to make the process more foolproof.
A stainless-steel pan allows you to see the milk solids clearly.
Keep the Heat Moderate
Medium heat provides enough energy to evaporate the water while giving you time to observe the butter.
Stir the Bottom of the Pan
The browned milk solids collect along the bottom. Stirring helps distribute them and prevents isolated spots from burning.
Stay Near the Stove
Brown butter is not a recipe to start and then leave unattended.
Once browning begins, the color can change quickly.
Transfer It Immediately
When the butter reaches the color and aroma you want, pour it into another container.
This stops the cooking much more effectively than simply removing the pan from the burner.
Brown a Little More Than You Need
If a recipe calls for a specific amount of brown butter, remember that some water evaporates during browning.
Starting with extra butter can help you finish with enough usable brown butter.
Common Brown Butter Mistakes
Mistake 1: Using Too Much Heat
High heat may speed up the process, but it also makes burning more likely.
Solution: Use medium heat and stay attentive.
Mistake 2: Walking Away
Brown butter can look unchanged for several minutes and then suddenly brown rapidly.
Solution: Stay nearby once the butter begins foaming.
Mistake 3: Ignoring the Bottom of the Pan
The milk solids settle at the bottom and can burn if left undisturbed.
Solution: Scrape and stir the bottom regularly.
Mistake 4: Judging Only by Color
Different pans and lighting can make color difficult to judge.
Solution: Combine visual cues with aroma and sound.
Mistake 5: Leaving It in the Hot Pan
Even after turning off the heat, the pan continues transferring heat.
Solution: Pour the butter into a heatproof container immediately.
Mistake 6: Straining Away All the Milk Solids
The brown flecks are flavorful.
Solution: Keep them unless your particular recipe calls for clarified brown butter.
What If My Brown Butter Is Too Dark?
If the milk solids are very dark brown and the butter smells bitter or burnt, it is generally better to start again.
Slightly darker brown butter can have a stronger toasted flavor, but blackened milk solids tend to taste unpleasantly bitter.
For a balanced flavor, aim for a rich golden-amber color.
Can You Fix Burnt Brown Butter?
Unfortunately, truly burnt butter cannot be completely rescued.
If only a few milk solids have become overly dark but the butter itself still smells pleasant, you may be able to carefully pour the liquid portion into a clean container while leaving the darkest solids behind.
However, if the entire butter smells smoky or bitter, starting over is the better option.
Fortunately, butter browns quickly, so the second attempt usually takes only a few minutes.
Brown Butter Variations
Once you understand the basic technique, you can customize it in several ways.
Sage Brown Butter
Add fresh sage leaves to the finished butter for a fragrant sauce.
Sage brown butter is excellent with pasta, ravioli, gnocchi, roasted squash, and potatoes.
Garlic Brown Butter
Add minced or thinly sliced garlic after the butter has browned and the pan has been removed from high heat.
Be careful because garlic can burn quickly.
Lemon Brown Butter
Add fresh lemon juice and a little lemon zest after browning.
This creates a bright sauce for fish, vegetables, chicken, or pasta.
Cinnamon Brown Butter
For baking, stir a small amount of ground cinnamon into cooled brown butter.
This pairs beautifully with apples, pears, pumpkin, and warm spices.
Honey Brown Butter
A little honey can create a wonderful glaze for pancakes, roasted carrots, cornbread, or baked goods.
Add honey after browning rather than during the initial browning process.
How to Use Brown Butter
Brown butter is incredibly versatile.
Brown Butter Cookies
Replace some or all of the regular melted or softened butter in cookies with cooled brown butter.
It is particularly delicious with chocolate chips, pecans, walnuts, oats, and spices.
Brown Butter Cakes
Use brown butter in cakes where its toasted flavor can complement vanilla, chocolate, apples, pears, or warm spices.
Brown Butter Frosting
Brown butter can be cooled and whipped with powdered sugar to create a deeply flavorful frosting.
It is especially good on spice cake, banana cake, carrot cake, and cupcakes.
Brown Butter Pasta
Toss hot pasta with brown butter, Parmesan, black pepper, and fresh herbs for a simple meal.
A little pasta water helps turn the butter into a silky sauce.
Brown Butter Vegetables
Drizzle warm brown butter over roasted vegetables such as:
- Brussels sprouts
- Carrots
- Green beans
- Butternut squash
- Cauliflower
- Asparagus
Brown Butter Mashed Potatoes
Stir brown butter into mashed potatoes for a richer, more complex flavor.
It works especially well with roasted garlic and fresh herbs.
Brown Butter Pancakes
Use brown butter in pancake batter or drizzle it over cooked pancakes.
Add maple syrup and toasted nuts for an especially satisfying breakfast.
Brown Butter Popcorn
Toss freshly popped popcorn with warm brown butter and a little salt for a simple upgraded snack.
How to Substitute Brown Butter in Recipes
Brown butter cannot always be substituted for regular butter at a strict 1:1 volume ratio because some of the water in butter evaporates during browning.
For recipes where moisture is important, such as cakes and cookies, this difference can affect the final texture.
If replacing regular butter with brown butter in a baking recipe, consider the amount of moisture lost during browning.
A practical approach is to brown slightly more butter than the recipe calls for and then measure the finished brown butter by weight.
For example, if you need 170 grams of finished brown butter, start with more than 170 grams of butter because some water will evaporate.
How to Store Brown Butter
Brown butter is excellent for making ahead.
Room Temperature
If you plan to use it shortly after making it, keep it covered at room temperature for a limited period.
For longer storage, refrigerate it.
Refrigerator
Transfer cooled brown butter to an airtight container and refrigerate.
It will firm up just like regular butter.
Stored properly, it can generally keep for around 1 to 2 weeks in the refrigerator.
Always check for off odors or other signs of spoilage before using.
Freezer
Brown butter can also be frozen.
Place it in a freezer-safe airtight container or wrap it tightly.
For convenience, freeze it in tablespoon-sized portions using an ice cube tray or silicone mold.
Once solid, transfer the portions to a freezer-safe bag or container.
This makes it easy to remove only what you need.
How to Reheat Brown Butter
If refrigerated brown butter has solidified, gently warm it in a saucepan or microwave until it reaches the consistency required by your recipe.
Use low heat and avoid overheating it.
If you simply need softened brown butter for baking, let it sit at room temperature until workable rather than melting it completely.
Can You Make Brown Butter Ahead of Time?
Yes.
Making brown butter in advance is a great way to save time when preparing desserts or dinner.
Once cooled, store it in the refrigerator. Before using it, bring it back to the consistency your recipe requires.
For recipes calling for melted butter, gently rewarm it.
For recipes calling for softened butter, let it soften naturally.
For sauces, warm it gently over low heat.
Brown Butter Recipe FAQs
Is brown butter just melted butter?
No. Brown butter starts as melted butter but is cooked further so the water evaporates and the milk solids toast.
That additional cooking creates its characteristic nutty flavor and golden-brown appearance.
What does brown butter taste like?
Brown butter tastes richer and more intensely buttery than regular butter, with toasted, nutty, slightly caramel-like notes.
How do I know when brown butter is ready?
Look for golden-brown milk solids, a deep golden or amber color, reduced bubbling, and a strong nutty aroma.
Can I brown salted butter?
Yes. Salted butter browns normally. Just account for its salt content when using it in a recipe.
What is the best pan for browning butter?
A light-colored stainless-steel skillet or saucepan is ideal because it makes the changing color of the butter and milk solids easy to see.
Can brown butter be refrigerated?
Yes. Store cooled brown butter in an airtight container in the refrigerator.
It will solidify as it chills.
Can you freeze brown butter?
Yes. Brown butter freezes well when stored in an airtight freezer-safe container.
Freezing it in small portions makes it particularly convenient.
Why did my brown butter burn?
The butter may have been cooked over excessive heat, left unattended, or kept in the hot pan after reaching the desired color.
Medium heat, frequent stirring, and immediate transfer to a heatproof container help prevent burning.
Do I need to strain brown butter?
Usually, no.
The toasted milk solids are flavorful and can add excellent texture and depth.
Straining is optional if you want a smoother finished butter.
Can I use brown butter for baking?
Yes. Brown butter is excellent in cookies, cakes, brownies, muffins, blondies, frosting, and many other baked goods.
Remember that browning removes some of the butter’s water, so substitutions may require small adjustments.
Does brown butter need to cool before baking?
It depends on the recipe.
If a recipe calls for melted butter, warm or cooled brown butter may work depending on the other ingredients.
If the recipe calls for softened butter, allow the brown butter to cool and solidify to the required consistency first.
Why is my brown butter not turning brown?
The butter must become hot enough for the milk solids to brown.
If it is only gently melting without reaching the browning stage, increase the heat slightly while continuing to watch it carefully.
Also remember that browning takes time because the water must evaporate first.
Can I make brown butter with vegan butter?
Some plant-based butter alternatives can brown, but their water and milk-solid content differs from dairy butter. Results vary significantly by brand.
For the classic nutty flavor associated with traditional brown butter, dairy butter provides the most reliable result.
Serving Suggestions
Because brown butter has such a concentrated flavor, a little can go a long way.
For a savory meal, try it with roasted vegetables, pasta, fish, chicken, potatoes, rice, or grains.
For breakfast, spoon it over pancakes, waffles, French toast, oatmeal, or baked apples.
For dessert, pair it with vanilla ice cream, apple desserts, pear desserts, chocolate desserts, cookies, cakes, brownies, or toasted nuts.
A simple combination of brown butter, flaky salt, and warm bread can also make an excellent appetizer or snack.
Recipe Notes for Best Results
- Use unsalted butter when you want maximum control over seasoning.
- Choose a light-colored pan so you can see the milk solids.
- Cook over medium heat.
- Stir or swirl frequently.
- Watch carefully once the butter begins turning golden.
- Remove the pan from the heat as soon as the butter reaches your preferred color.
- Transfer the butter immediately to a heatproof container.
- Keep the toasted milk solids for maximum flavor unless your recipe specifically calls for them to be removed.
- Remember that brown butter loses some water during cooking.
- Store leftovers in the refrigerator or freezer.
Final Thoughts
Learning how to make brown butter is one of the easiest ways to add restaurant-quality flavor to everyday cooking and baking. The technique requires only butter, a saucepan, and a few minutes of attention, yet the result has a remarkable depth that ordinary melted butter simply cannot provide.
The most important thing is to watch rather than rely solely on the clock. Listen for the bubbling to slow down, look for golden-brown milk solids, and pay attention to the unmistakable toasted aroma. Once those signals become familiar, you will be able to make consistently delicious brown butter every time.
Keep a batch in the refrigerator, and you will always have an easy way to make cookies, pasta, vegetables, pancakes, cakes, and sauces taste just a little more special.
Recipe Card
Brown Butter Recipe
Prep Time: 2 minutes
Cook Time: 5–10 minutes
Total Time: 7–12 minutes
Servings: About 12 tablespoons
Yield: Approximately ¾ to ⅞ cup brown butter, depending on evaporation
Cuisine: French-inspired
Course: Sauce / Ingredient / Baking Component
Ingredients
- 1 cup (2 sticks / 226 g) unsalted butter
Instructions
- Cut the butter into evenly sized pieces and place it in a light-colored skillet or saucepan.
- Heat over medium heat until the butter melts.
- Continue cooking as the butter begins to foam and bubble. Stir frequently and scrape the bottom of the pan.
- As the water evaporates, the bubbling will gradually decrease and golden-brown milk solids will begin appearing.
- Continue stirring until the butter develops a rich golden-amber color and smells distinctly nutty and toasted.
- Immediately remove the pan from the heat.
- Pour the brown butter into a heatproof bowl to stop the cooking process.
- Use warm, cooled, or chilled depending on the recipe.
Recipe Notes
- A light-colored pan makes it much easier to judge the color.
- Do not use high heat; it can cause the milk solids to burn.
- The butter may continue cooking after it leaves the burner, so transfer it immediately.
- For baking, remember that some water evaporates during browning.
- Keep the browned milk solids for maximum flavor.
- Refrigerate leftovers in an airtight container for approximately 1–2 weeks or freeze for longer storage.
- If the butter smells smoky or bitter and the milk solids are nearly black, it has likely been burned and should be replaced.